Building a REX: Difference between revisions
Jump to navigation
Jump to search
(→.jed) |
|||
| Line 30: | Line 30: | ||
==Assembly== | ==Assembly== | ||
* | * Place a sheet of medium grit sand paper on a cutting board and sand the long edges of the pcb down until the holes are about half gone. Use the white marker lines in the corners. Sand until the edge of the board is almost to the lines, but the lines are still there. | ||
* Locating pin1 on the TSOP flash chip. There | * Install these parts: | ||
:flash | |||
:XCR3064XL | |||
:LP2980 | |||
:R1 = 0 ohm | |||
:R3 = 10K ohm | |||
:C4 = | |||
All other locations left empty. | |||
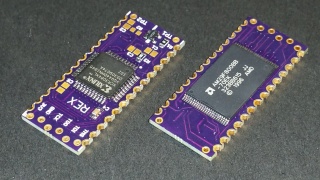
* Locating pin1 on the TSOP flash chip. There is a dot next to one corner, but it's almost invisible on the finished pcb, because it's copper under solder mask, not silk screen. See picture above for orientation of flash chip. | |||
* Links to youtube videos showing how to do "drag technique" for soldering fine pins? | * Links to youtube videos showing how to do "drag technique" for soldering fine pins? | ||
Revision as of 11:37, 12 March 2017
Building a REX from scratch, using the files and info released by Stephen Adolph.
Brian K. White - bw.aljex@gmail.com
Files Used
Pictures
BOM
Bill of Materials. Order each of these.
These are parts to build 3 REX boards, because you can't order fewer than 3 boards from OSHPark. If you only want to build one board, you'll have to order 3 pcbs from OSHPark, reduce the quantities of the parts on the DigiKey cart, and just discard 2 of the pcbs from OSHPark.
- When you press "order it" you get 3 boards.
- This cart is pre-loaded with quantities to build 3 REX boards.
- Order 1 flash chip per REX. (so, 3 chips if you want to build 3 boards)
- Pick any version of the chip which matches this pattern:
- AM29F800BB-##E*
- Where:
- ## = Speed: 90 or lower (90 or faster)
- E = Package: Only E, TSOP
- * = Temperature range: Any
- Example (what I got):
- AM29F800BB-70EK
Assembly
- Place a sheet of medium grit sand paper on a cutting board and sand the long edges of the pcb down until the holes are about half gone. Use the white marker lines in the corners. Sand until the edge of the board is almost to the lines, but the lines are still there.
- Install these parts:
- flash
- XCR3064XL
- LP2980
- R1 = 0 ohm
- R3 = 10K ohm
- C4 =
All other locations left empty.
- Locating pin1 on the TSOP flash chip. There is a dot next to one corner, but it's almost invisible on the finished pcb, because it's copper under solder mask, not silk screen. See picture above for orientation of flash chip.
- Links to youtube videos showing how to do "drag technique" for soldering fine pins?
- Links to minimum tools needed?
Flash the Firmware
There are two things to flash;
- The .jed, which configures the blank CPLD into a functional circuit or device. You must flash the .jed first.
- The firmware, which (I think?) runs on the device created by the .jed ?, and (this part is certain) includes an option-rom image loaded in one of the 32k blocks of flash, which contains REXMGR.
.jed
- Install LabTools 14.7 from Xilinx
- Supply +5vdc to pin 1 of the board edge, and gnd to pin 14.
- Same as the M100 would do when installed.
- Simplest is use an empty Molex socket on a breadboard, and snap the module into the socket the same way it would be in a M100. Or I suppose you could just use an actual Model 100/102/200, if you didn't care about the data on it.
- (link to searchable part numbers, there are at least two companies that made the sockets and carriers.)
- (Contact Brian White bw.aljex@gmail.com for a socket. I got a load of 130 of them cheap.)
- Hook up a platform usb-ii to the jtag pins with a short section of single row pin header.
- (The staggered/offset holes makes tension on the straight row of pins, which holds them in place and makes a solid contact without any fancy spring loaded sockets. Google "C-MOD S6 Manual" and see the drawing.)
- Temporarily pull PORT_EN high on the cpld by temporarily jumping from the vcc pin from the jtag, to R3, on the side closest to the center of the board. (Be careful and get this right. The other side of R3 is GND. If you short vcc to gnd you may burn out the 3.3vdc regulator (part number).) Just clip a test clip to the jtag vcc pin and manually hold the other end touching the side of R3 for the few seconds it takes iMPACT to program.
- While holding the PORT_EN jumper in place, use iMPACT to program the .jed file.
firmware
Follow the directions for the 4.9 update.
This happens to also serve as a way to do a first-time flash of the firmware and REXMGR software.
