WP-2: Difference between revisions
(→DIY) |
No edit summary |
||
| Line 91: | Line 91: | ||
[http://randomvariations.com/2014/09/30/tandy-wp-2-running-an-infocom-interpreter/ ZXZVM] Infocom Z-Machine Interpreter | [http://randomvariations.com/2014/09/30/tandy-wp-2-running-an-infocom-interpreter/ ZXZVM] Infocom Z-Machine Interpreter | ||
==Support Software== | |||
[[WP2DOS]] TPDD emulator and document conversion utility. | |||
==Accessories== | |||
WP-2 can use a Tandy Portable Disk Drive, or clones like Brother FB100, knitking FDD19, Purple Computing D103, or emulators like dplus or laddiealpha. | |||
:[[TPDD]] | |||
:[[TPDD server]] | |||
===Serial Cable for TPDD=== | |||
To connect a real TPDD to the WP-2, you need a DE9F to DB25F straight through (not null-modem) cable or combination of cables and adapters.<br> | |||
To avoid putting strain on the serial plug, It's better to use a cable with just a DB9M one one end, rather than, say, a 9-25 adapter plugged right into the WP-2. A cable that has DE9F on one end, and DB25F on the other end, and straight-through wiring (not null-modem) all in one piece is uncommon. It will be simpler to get a standard 9-25pin "modem" cable, and a 25pin female-female gender-changer. | |||
:https://amazon.com/dp/B002I9XYCC | |||
:https://amazon.com/dp/B0006IEV6U | |||
Another option is you can build a custom TPDD cable just for connecting a TPDD to a WP-2 or PC | |||
:https://github.com/bkw777/TPDD_Cable#for-tandy-wp-2-most-modern-pcs-most-usb-serial-adapters-and-anything-else-with-a-de9m-dte-port | |||
===Serial Cable to PC=== | |||
To use a TPDD emulator, you need a 9-pin female null-modem serial cable. | |||
To connect a WP-2 to a PC with a real com port, you can use a DE9F to DE9F null-modem cable: | |||
:https://amazon.com/dp/B00QM8ZP5E<br> | |||
or<br> | |||
:https://amazon.com/dp/B00006B8BJ | |||
To connect to a standard usb-serial adapter with DE9M connector, assuming the usb-serial adapter has a few feet of usb cable, you can use a mini null-modem adapter instead of a serial cable. | |||
:https://amazon.com/dp/B075XGRLXW | |||
To connect directly to a PC usb port in a single dedicated-purpose cable with no adapters: | |||
:https://amazon.com/dp/B07DRHB264 | |||
:https://amazon.com/dp/B01MY9INHL | |||
:https://amazon.com/dp/B008634VJY | |||
Revision as of 20:14, 24 April 2022
Manuals
https://archive.org/search.php?query=Tandy%20WP-2
RAM Disk
Battery-backed SRAM powered by the wall power when present, the AA batteries when wall power is absent, and the CR2430 coin cell when wall power and AA batteries are absent.
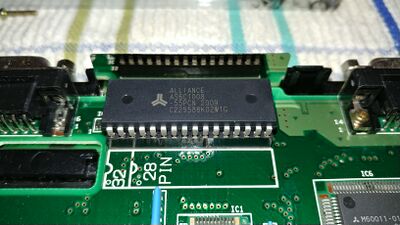
Internal ram upgrade socket can take a single chip, either 32K or 128K.
- 32K: 32Kx8 parallel SRAM, 5v, low power, DIP-28
- 128K: 128Kx8 parallel SRAM, 5v, low power, DIP-32
Many different chips are compatible. Here are just a few for example & reference:
- Hitachi HM628128LP
- Alliance AS6C1008-55PCN from DigiKey or from Mouser <-- BEST BATTERY LIFE
- ICSI IS62C1024LL-70W also LL or L, 70 or 55
- BSI BS62LV1024PC-70 also 1025 or 1027 or 1028, PC or PI, 70 or 55
- Toshiba TC551001CP-70L
- AMIC LP621024D-70LL
- Goldstar GM76C8128
- Samsung KM681000BLP-7L
- ASI MT5C1008CW-70L/883C
Generic ebay search for the type of chip, not a particular part number:
https://ebay.com/sch/i.html?_nkw=128Kx8+sram+dip+32
Installation notes:
- Turn the PROTECT switch OFF before installing.
- Press the Reset pin or F2+CTRL+BKSP after power-on after installing.
- Format the new ramdisk: FILES -> RAM DISK -> HELP -> Format
The reset will have wiped your system settings, so you may need to configure the battery type again:
- SETUP -> System -> Battery type
Expansion Card
Original
DIY
RAM Card
ROM Card
https://github.com/bkw777/WP-2_IC_Card
References / notes
http://randomvariations.com/wp-content/uploads/2014/09/IMG_8920_wp2_zork1.jpg
Toshiba Memory Card / IC Card
32K, 64K, or 128K RAM card
32K, 64K, 128K, or 256K ROM card
Connector that fits the Expansion port:
- Similar to PC-Card/Cardbus/PCMCIA, but thinner with a single row of pins instead of two rows of pins.
- 38 pins, single row, 1.27mm pitch
- Card main body 3.2mm thick x 54mm wide
- File:JC20-B38S-F1.pdf
- JAE JC20-B38S-F1-A1 0.29mm-0.45mm pcb, centered, https://www.asapaog.com/rfq/japan-aviation-electronics/jc20-b38s-f1-a1/
- JAE JC20-B38S-F2-A1 0.5mm pcb, offset
- JAE JC20-B38S-F3-A1 0.2mm pcb, offset
Memory Battery
Binary Apps
See the Service Manual pages 4-16 and D-1.
CamelForth FORTH Interpreter
ZXZVM Infocom Z-Machine Interpreter
Support Software
WP2DOS TPDD emulator and document conversion utility.
Accessories
WP-2 can use a Tandy Portable Disk Drive, or clones like Brother FB100, knitking FDD19, Purple Computing D103, or emulators like dplus or laddiealpha.
Serial Cable for TPDD
To connect a real TPDD to the WP-2, you need a DE9F to DB25F straight through (not null-modem) cable or combination of cables and adapters.
To avoid putting strain on the serial plug, It's better to use a cable with just a DB9M one one end, rather than, say, a 9-25 adapter plugged right into the WP-2. A cable that has DE9F on one end, and DB25F on the other end, and straight-through wiring (not null-modem) all in one piece is uncommon. It will be simpler to get a standard 9-25pin "modem" cable, and a 25pin female-female gender-changer.
Another option is you can build a custom TPDD cable just for connecting a TPDD to a WP-2 or PC
Serial Cable to PC
To use a TPDD emulator, you need a 9-pin female null-modem serial cable.
To connect a WP-2 to a PC with a real com port, you can use a DE9F to DE9F null-modem cable:
or
To connect to a standard usb-serial adapter with DE9M connector, assuming the usb-serial adapter has a few feet of usb cable, you can use a mini null-modem adapter instead of a serial cable.
To connect directly to a PC usb port in a single dedicated-purpose cable with no adapters:


